Tips, tricks and what you need to know.
We get asked a lot about LED pixel strip (sometimes known as pixel tape, ‘smart strip’ or ‘intelligent strip’).
The first thing that most people want to know is exactly what pixel strip does and how it differs from standard non-addressable LED strip. But there’s a lot more to pixels than the answer to this query alone. Also, at ENTTEC, we make LED pixel too, so people naturally want to know how these fit into the mix.
With our growing range of pixel products becoming increasingly popular throughout the entertainment and architectural lighting industries, we thought it was a good time to put some of your most common questions to our Research & Development team and come up with some expert answers to help set you on your merry way (especially if you’re just starting out on your lighting control adventures, in which case, welcome onboard!).
Introduction to LED pixel strip
What is pixel strip?
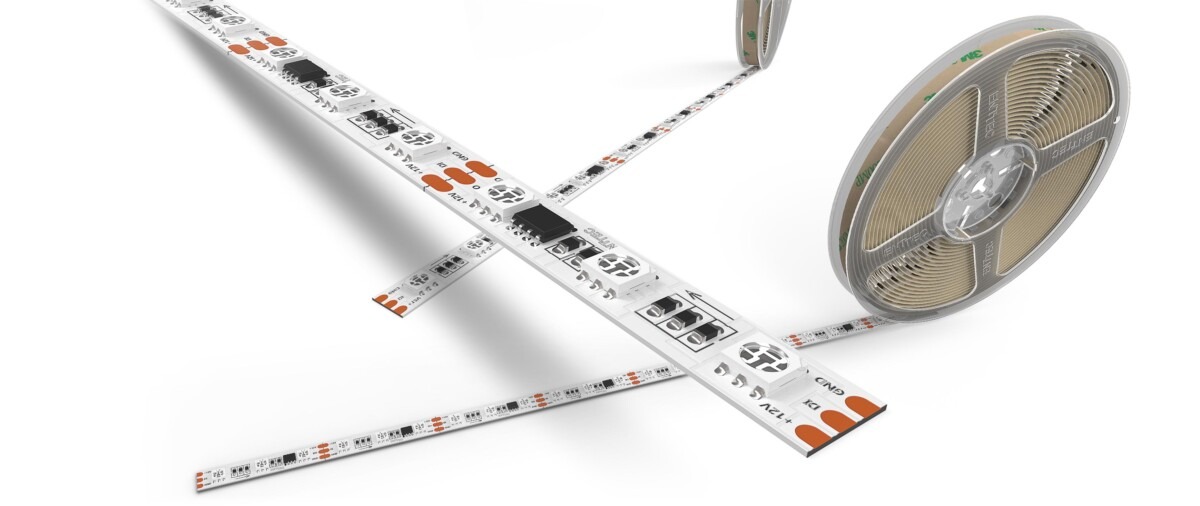
Pixel strip is flexible printed circuit board (PCB) which is populated by multi-coloured, addressable surface mounted (SMD) light-emitting diodes (LEDs). This circuit board usually has an adhesive backing, which aids with quick and easy installation.
Unlike standard RGB strips, each LED on a pixel strip has its own chip which enables it to be controlled to respond individually (e.g: change colour, switch off etc). These are known as addressable LEDs. Pixel strips can still do everything that a non-addressable strip can do … only more.

Designing Your System
While we’re mostly going to focus on pixel strip here, we wouldn’t be ENTTEC if we didn’t at least mention pixel dots. When it comes to dots versus strip, both products are easy to install and share a certain degree of functionality, so which should you choose?
The answer is going to depend upon your intended application and the space you have available in which to create it. Consider the following points:
Pros of using strips
- Steady and consistent light
- Lightweight
- Takes up less physical space than dots
- Easy to make unobtrusive beneath a diffuser
- Good for ephemeral installations on a small budget
Pros for using dots
- Higher IP rating than tape
- More visual appeal as a conspicuous feature
- Greater light output
- Robust construction: hard-wearing and longer-lasting
- No extrusions required or heat management issues
- Can be installed into virtually any conceivable shape
- Wide variety of designs to choose from
Whichever you decide to go with, there are a few basic tenets that you should give serious consideration to prior to getting your project started.
Firstly, remember that each project is unique. The pixel product you’ll want to purchase will vary depending on a number of factors including (but not limited to) aesthetics, environment and the availability of space. So before you hand over your hard-earned cash, have a good think about the following:
• What type of aesthetics does the project require?
• Where will the LED strip be placed?
• What type of surface will the LED tape be placed on or within?
Why should I use ENTTEC strip as opposed to other brands?
ENTTEC strips are designed in Australia to surpass global industry benchmarks, not merely conform to them.
We make it our mission to use better substrates and thicker copper than other strip on the market. Manufactured to the highest standards, our strips are then quality checked and tested by our team of engineers in order to ensure optimal compatibility with our popular range of pixel controllers.

Thicker copper tracks offer more durability, better heat dissipation and improved current flow, all of which are vital factors towards achieving the best possible product. Heat dissipation in particular is a critical safety issue when it comes to high density tapes, so we pay serious attention to the amount of copper we use on our strips.
Inferior PCBs commonly have a copper thickness of around one ounce per square foot, whereas we generally require our strips use three times that amount.
So with ENTTEC, you know you’re in safe hands.
And lastly, regardless of which product you end up using, never forget …
All pixel strips should be installed by a qualified electrician!
Questions & Answers

Do I need 5 V or 12 V tape?
This depends on the end user application.
12V means 3 leds = one pixel, 5V each led is a pixel. Power usage is the same.
The colour change due to voltage drop on 5 V pixel tape is more apparent than on a 12V. Therefore, the maximum possible run of a 12V is higher than a 5V tape. However, the power consumption of a 12V tape is higher than a 5V reel. Therefore, it’s best to calculate and understand the power availability of your system before making a purchase.
What about RGB versus RGBW tape? Which do I choose?
This again depends on the end user application.
RGB Pixel Tape uses a 3-in-1 color (red, green and blue) LED chip. By having the three colors, red, green and blue, at full brightness, the end user can obtain a nearly white color. RGB Tape also uses 3 channels per led, which means lesser number of DMX universe, when it comes to mapping them.
RGBW Pixel tape has a 4-in-1 color (red, green, blue and white) LED chip. Although RGB can produce a color close to white, the dedicated white LED of the RGBW Pixel Tape provides a much purer white tone. RGBW tape uses 4 channels per led, which means a larger number of DMX universe will be required during mapping the Tape.
How many DMX channels are there per pixel tape ?
The reason it’s called pixel tape is that it can treat each dot on the tape as a separate combination of RGB.
• 1 Pixel = 3 DMX Channels (RGB)
• 1 Pixel = 4 DMX Channels (RGBW)
With different densities of LED on the tape, and different lengths, you can multiply it all together and get a variety of results.
For instance:
• (8PL30) 30 RGB LEDs/m tape x 5 meter reel = 150 pixels (150 pixels x 3) = 450 channels
• (8PL60) 60 RGB LEDs/m tape x 5 meter reel = 300 pixels (300 pixels x 3) = 900 channels
• (8PL144) 144 RGB LEDs/m tape x 2 meter reel = 288 pixels (288 pixels x 3) = 864 channels
• (8PX30) 30 RGBW LEDs/m tape x 5 meter reel = 150 pixels (150 pixels x 4) = 600 channels
• (8PX60) 60 RGBW LEDs/m tape x 4 meter reel = 240 pixels (240 pixels x 4) = 960 channels
Handy to remember:
• 170 RGB Pixels = 510 DMX Channels = 1 DMX Universe
• 128 RGBW Pixels = 512 DMX Channels = 1 DMX Universe
Our products can drive up to 2U per port:
Product |
RGB Pixels |
RGBW Pixels |
| Pixie Driver | 170 | 128 |
| Pixelator | 340 | 256 |
| Pixelator Mini | 340 | 256 |
| Pixelator Mini PX1-8D | 340 | 256 |
| PSAT | 340 | 256 |
| Pixel Port | 340 | 256 |
What type of surface will be suitable for installing pixel tape?
The pixel tape should be installed on a clean and dry surface. Please clean the surface with alcohol using a clean cloth prior to installation.
The surface should be thermally conductive and permit sufficient heat dissipation from the tape. Check out ENTTEC’s extrusions to get an idea of the best surfaces for optimum performance (note: these products are not presently available for purchase in Europe).
Surface should not be textured or a low surface energy material.
How do I wire pixel tape to a Pixie Driver?
Like this:
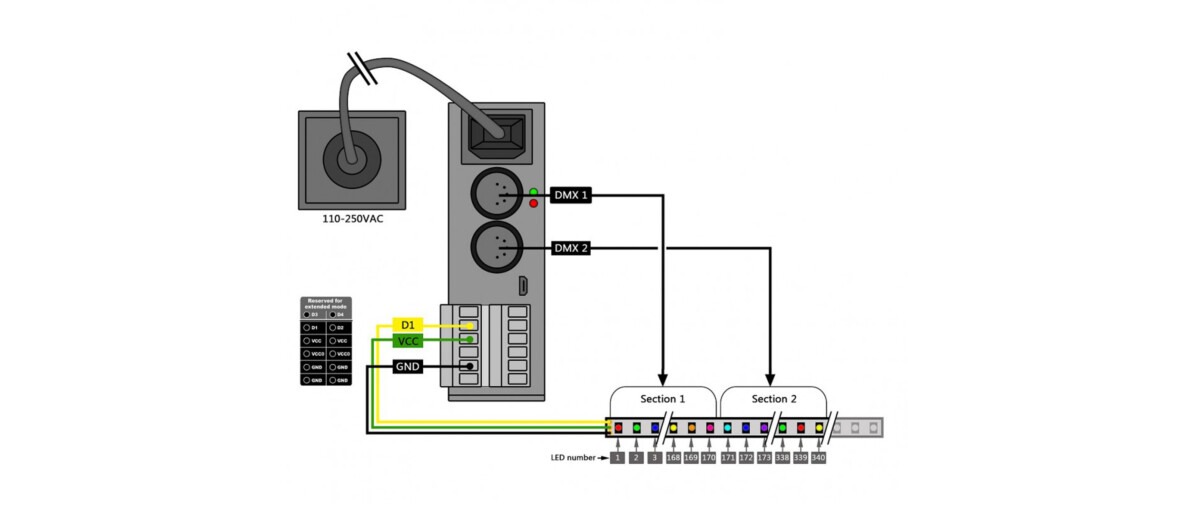
For more information please refer to the Pixie Driver User Manual.
How do I wire pixel tape with a Plink Injector?
Like this: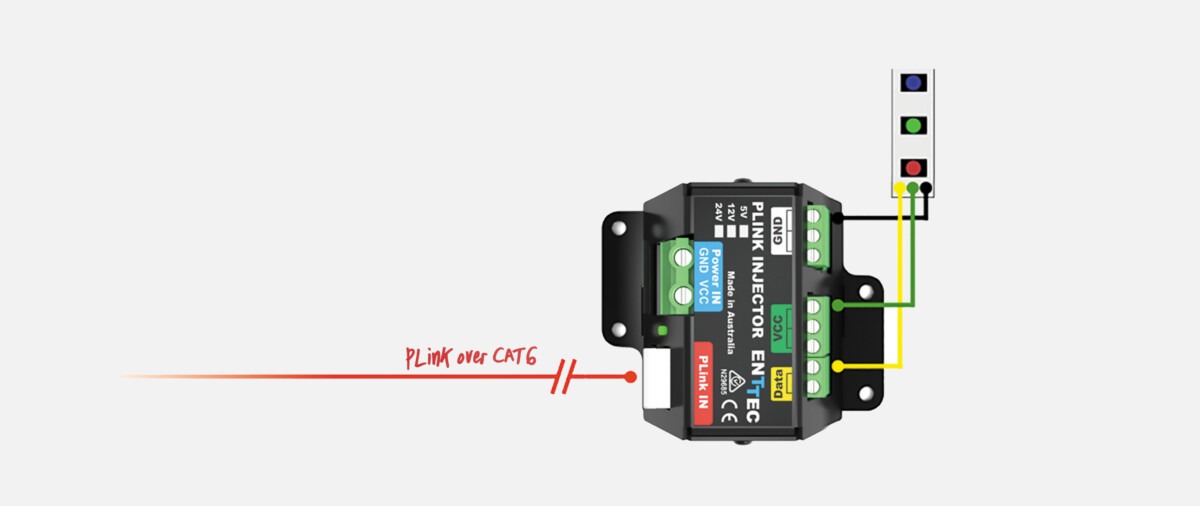
Why are LEDs at the end of the tape warm white/pink when driven white?
This occurs because of voltage drop along the LED tape when attempting to power a longer length of the tape. As a result, of the voltage drop, pixels along the tape would gradually vary in color when driven white. It is best to determine the maximum possible length of run before voltage drop will begin to affect (x meters) and to inject power after every x meters.

The greater the drop in voltage along a series of white LEDs, the more pink in hue those furthest away from the power source will appear. The entire length will also marginally decrease in brightness as the voltage lowers. The majority of tapes and dots display these phenomena in a very subtle fashion while some others may be slightly more pronounced. Likewise, the degree to which the human eye perceives it will naturally differ from person to person, but most people will find the color change virtually indiscernible.
(PLEASE NOTE: The above drawing is not intended to be an accurate scientific diagram. It’s a simple visual representation to give you a rough idea of the sort of effect you might sometimes observe when different percentages of voltage drop occur.)
I sourced some pixel tape from Amazon/Alibaba/Honest Bob’s Super-Cheap Discount Lighting Warehouse™. Will it work with an ENTTEC Pixelator/Pixie Driver?
This will depend on the protocol of the tape sourced and the wiring involved. There are two different types of wiring: 3-wire or 4-wire tape. All ENTTEC pixel controllers only support 3-wire tape.
ENTTEC’s Pixie Driver supports the following protocols:
- 9PDOT-8bit
- WS2811, WS2812, WS2812B
- APA-104 LEDs
ENTTEC Pixelator and Pixelator Mini support the following protocols:
- 9PDOT-8bit
- 9PDOT-16bit
- WS2811, WS2812, WS2812B, WS2813
- SK6812
- TM1804
- TM1812
- APA-104 LEDs
Please note: 9PDOT protocols are only supported by revB (units sold from 2017 onwards). There may be other LED protocols similar to the ones supported by ENTTEC. We cannot claim to support all of them, but if you do happen to find one that works and is not listed, please let us know so we can update our documentation.
Why does my pixel tape flicker at the end?
This occurs because of voltage drop along the LED tape when attempting to power too long of a strip. As a result of the voltage drop, pixels at the end of the tape would flicker. It is best to determine the maximum possible length of run before voltage drop will begin to affect (x metres) and to inject power after every x metres.